


Put simply, there are three ways to approach building a website:
- Design-focused
- SEO & UX-focused
- Design, SEO & UX combined
What you need to do post-launch depends on what you already implemented before launch.
The best approach is the third option — design, SEO and UX combined from day one. But if you didn’t do that from the start, do it fast after launch. First impressions count.
Read also: SEO for Beginners
You don’t want Google to fully crawl your site and find missing essentials like:
- A team section on the About Us page
- Links to your social media profiles (and a SameAs schema markup element)
- H1s on your homepage
- A missing favicon
- Missing meta descriptions
Nor do you want Google to see poorly optimised existing elements, such as:
- A sitemap containing template parts
- A robots.txt file with no link to your sitemap
- Stock photography uploaded without resizing, compressing, or optimising filenames and alt text
And if you thought we’d forgotten AI — we haven’t. You’ll want to think about an llms.txt file too, at minimum.
Does any of this sound complex? Don’t worry — this guide walks you through each concept and gives you clear direction on how to fix it.
Let’s start.
1. Broken link / 404 check
You’d be surprised how many newly built websites launch with broken links. This usually comes down to multiple people being involved in the build — a designer, a developer, whoever’s populating the content — plus the inevitable rounds of changes and revisions along the way. Somewhere in that process, links break.
For small websites, it’s tempting to check manually by clicking around the site. Even for small sites, this isn’t recommended — it’s slow, and easy to miss pages. A much better option is running a Screaming Frog crawl, which quickly flags every broken link on your site. The free version covers websites up to 200 URLs, which is plenty for most new launches.
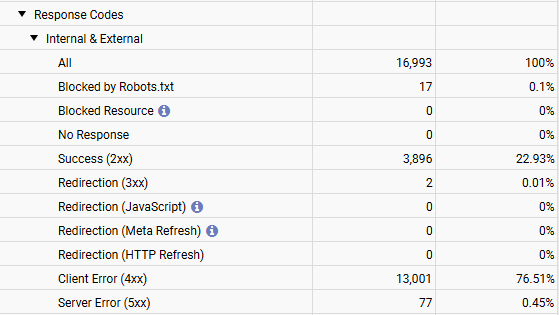
Pro tip: if you see an unusually high number of crawl errors relative to the size of your website, check whether Screaming Frog’s bot has actually been blocked by your platform or hosting provider before assuming every one of those is a real 404. Some platforms and firewalls block crawler user-agents by default, which can return a wall of false 4xx errors that have nothing to do with your actual links.
Once you’ve got your results:
- Review your custom 404 page while you’re at it — make sure it exists, matches your site’s design, and links people back to your homepage or key pages, rather than leaving them stuck
- Fix or redirect any broken internal links — either update the link to point to the right page, or set up a 301 redirect if the destination page has moved or been renamed
- Check your outbound links too — links pointing to other websites that no longer exist look just as sloppy to visitors (and to Google)
Read also: Technical SEO Checklist
2. Core Web Vitals check
During build, it’s common to test different page builders, apps, and plugins — and in the rush to launch, basic 101s like image resizing and compression often get skipped. All of this can add up to a slow, poorly performing website.
Google measures this through three Core Web Vitals: LCP (how fast your main content loads), CLS (how much your layout shifts around as it loads), and INP (how quickly your site responds to clicks and taps). You can check all three for free using PageSpeed Insights — just enter your URL.
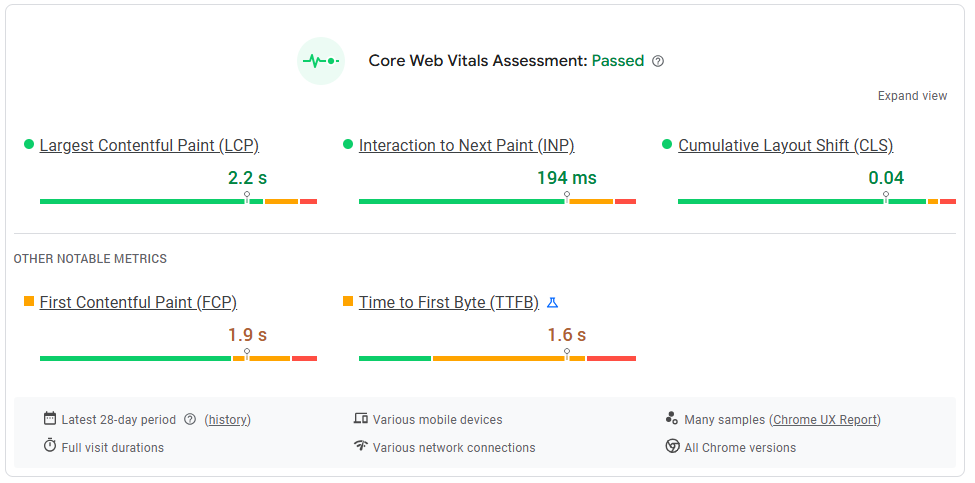
Pro tip: a “Passed” badge only covers the three official Core Web Vitals. Notice First Contentful Paint and Time to First Byte are both sitting in the amber zone here — they’re not part of the pass/fail assessment, but a slow TTFB in particular is often the root cause behind a weak LCP down the line. Worth keeping an eye on the “Other notable metrics” section even once you’ve technically passed.
To improve your scores:
- Review all non-essential plugins on WordPress/WooCommerce, or apps on Shopify. Every plugin or app adds extra code that has to load — the fewer you’re running, the faster your site.
- Compress and resize your images using Canva or Photoshop, regardless of platform. With image SEO, it’s always better to optimise before you upload, not after. Relying solely on your platform, app, or plugin to do this for you is a weak strategy — it often still leaves images too large, or compresses them poorly, resulting in blurry visuals.
- Turn on lazy loading for images and video, so content below the fold only loads once a visitor scrolls to it, rather than all at once on page load.
- Install and configure a speed plugin or app. On WordPress/WooCommerce, WP Rocket is a solid option. On Shopify, check the built-in speed report under Online Store → Themes, or consider an app like Hyperspeed. On BigCommerce, most speed optimisation is handled at the platform/CDN level, so focus your effort on images and app bloat instead.
Also read our full platform-specific optimisation guides for:
3. Sitemap optimisation and submission to Google Search Console
Your sitemap is a roadmap of your website.
You can usually find it by typing https://yourwebsite.com/sitemap.xml into your browser (replace “yourwebsite” with your actual domain). Depending on your platform, it might live elsewhere — for example, at sitemap_index.xml if you’re running Yoast on WordPress/WooCommerce, or xmlsitemap.php on BigCommerce.

Sitemap-1.xml), instead of being split by content type. This makes it harder for Google to crawl efficiently and much harder for you to diagnose indexing issues, since you can’t tell from Search Console whether it’s your products, your collections, or your pages that are struggling to get indexed.Your sitemap should only contain the pages you want Google to show in search results.
If you’re an ecommerce site, that means your product and collection pages — not your checkout or cart pages. Likewise, you don’t want content fragments like headers, footers, or testimonial blocks sitting in your sitemap as if they were finished pages, rather than pieces of a template. And you don’t want a leftover page like /test-page-delete-later showing up in your sitemap either — even if you’re not linking to it anywhere, Google can still find and index it.
Your task:
- Delete, draft, or noindex all demo and test pages
- Remove any content fragments or template parts from the sitemap
Once that’s done, submit your website and sitemap to Google Search Console. It’s worth doing this last, once everything is cleaned up — you don’t want to hand Google an unoptimised sitemap before you’ve had the chance to fix it.
4. Optimise your lang tag
If your target audience is in the UK, you don’t want your lang tag reading lang="en-US". You want to tell Google straight away which language your site is written in and which audience it’s meant for.

.co.uk domain, targeting a UK audience, but its HTML declares lang="en-US". It’s a small line of code, but it’s one of the first things Google (and AI agents) use to understand who a page is written for — worth checking as soon as your site goes live, since it’s rarely caught in a manual review.Here’s how to fix it on the most popular platforms:
- WordPress/WooCommerce — Settings → General → Site Language
- Shopify — Settings → Languages → Change default
- BigCommerce — Settings → General → Store Profile → Locale → Default Language
5. Schema markup
Schema markup is a universally recognised language that both search engines and AI agents use to understand your website and the connections between different entities on it.
Sounds complex? It’s not, really.
At a minimum, your schema should tell search engines and AI, unambiguously:
- Whether you’re an organisation or a personal blog
- Your organisation’s name (i.e. your website/brand name)
- Where your logo/favicon image is hosted — the full URL
- Which other profiles you have out there — your Facebook page, YouTube channel, LinkedIn, and so on (this is the SameAs element we flagged earlier)
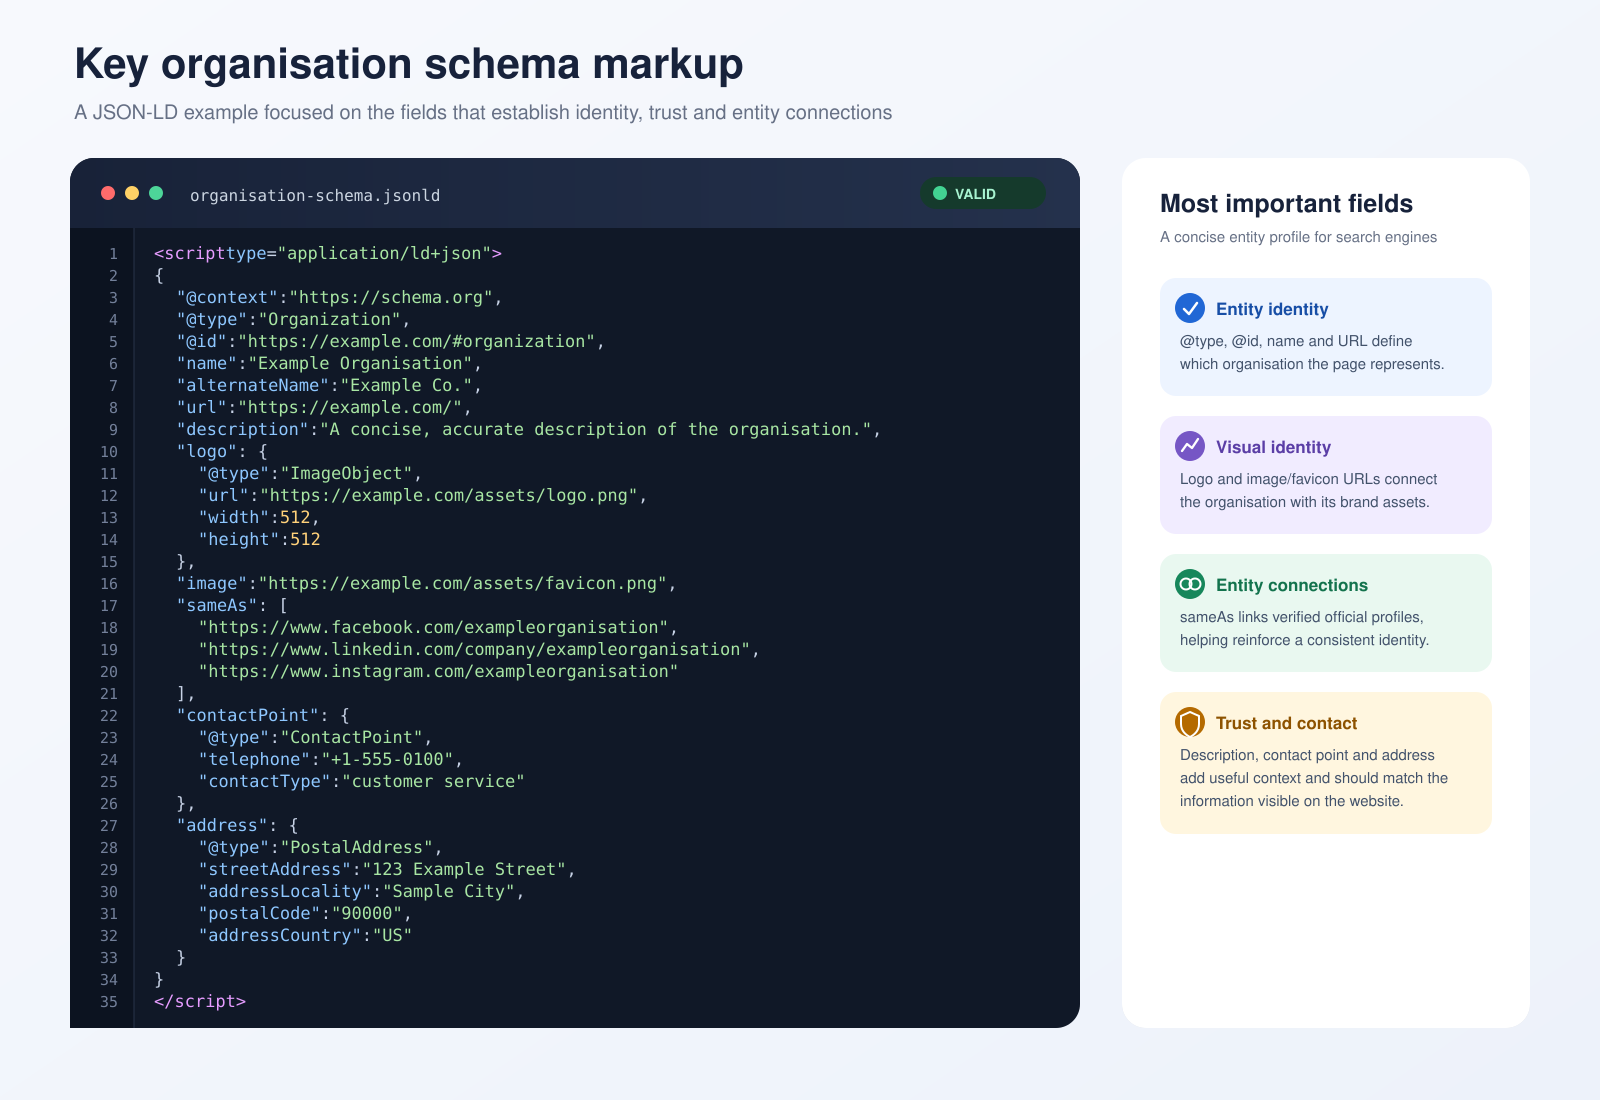
Depending on your site, it’s worth going further than the basics too — Product schema if you’re selling online, LocalBusiness schema if you have a physical location (this pairs directly with the NAP consistency covered in the citations section), and Article or BlogPosting schema for content like this post.
Read also: Schema and Structured Data
How to set it up:
- WordPress/WooCommerce — a plugin such as Yoast, Rank Math, or All in One SEO Pack
- Shopify — an app such as Schema Plus – AI & SEO JSON-LD, or coding it directly into your theme templates
- BigCommerce — via Script Manager (Storefront settings) to insert JSON-LD manually, or through an app such as JSON Schema App if you’d rather not manage it by hand. Worth checking your theme first — BigCommerce ships with some basic schema by default, but it’s often incomplete for Organization/WebSite-level details like the ones covered here.
Once it’s live, run your page through Google’s Rich Results Test to confirm it’s valid and error-free.
6. Optimise your metadata
This is the blue title and black description text people see in search results (the SERP snippet).
Review what’s missing and what can be improved — titles that are too long or generic, and meta descriptions that are missing entirely or don’t actually describe the page.

7. Set up your llms.txt file
It’s worth building an llms.txt file — but it’s important to be clear about what it actually does, because there’s a lot of confusion around this in 2026.
What it doesn’t do: llms.txt has no effect on your Google Search rankings or on whether you appear in AI Overviews. Google’s Search team has confirmed this directly.
What it does do: since May 2026, Chrome’s Lighthouse engine (which powers PageSpeed Insights and Chrome DevTools) added a new “Agentic Browsing” category that checks — among other things — whether your site has a valid llms.txt file at the domain root. This isn’t about search ranking; it’s about how well AI agents (like ChatGPT’s browsing mode, Anthropic’s Computer Use, or Google’s Project Mariner) can read, understand, and act on your site on a user’s behalf. It’s a separate signal from a separate team, and it’s here to stay.
There’s also a smaller, more direct benefit: llms.txt gives AI models a short, curated summary of what your business actually does and cares about. Previously, if you wanted to signal that a specific product, collection, or specialism was central to your business, you’d rely on tricks like moving it higher in your navigation, featuring it on the homepage, or repeating keywords across your copy. Now, if you’re a family-owned business, a curated fashion retailer, or an award-winning fishing tackle specialist, you can say so plainly in a place built for exactly that purpose.
How to set it up:
- WordPress/WooCommerce — best done via SFTP, since plugins like Yoast currently offer limited control over the file
- Shopify — use an app, or create an
agents.md.liquidtemplate within your theme - BigCommerce — BigCommerce doesn’t allow direct root access, so this takes an extra step: upload the file via Settings → File Access (WebDAV), then create a 301 redirect from
/llms.txtto that file’s URL under Server Settings → 301 Redirects. Confirm it’s working by visitingyourstore.com/llms.txtdirectly and checking it loads as plain text.
8. Build citations
Start with a Google Business Profile and a Bing Places for Business listing. Fill in every field these platforms allow — treat each profile as if it’s the only thing a potential customer will see before deciding whether to convert.

Read also: Local Citations Made Simple
Other directories worth submitting to and fully optimising:
- Trustpilot
- Yell
- Yelp
- Apple Business Connect
- Crunchbase
Note: when submitting to local directories, follow the NAP principle — your trade name, address, and phone number should appear exactly the same way everywhere. Consistency here helps Google connect your listings together and builds trust and transparency for anyone checking you out online.
How SEO Impact can help
In 2026, there’s little room for error — Google and AI systems understand your website better than ever, and getting the basics wrong is easier to spot than it used to be.
So don’t skip these steps.
We’re strong advocates of educating our clients, not gatekeeping. If you’ve got the time to work through this checklist yourself, we genuinely encourage it.
But if you’re time-constrained, or some of this — schema markup, Core Web Vitals, llms.txt — feels like more than you want to take on alone, we can help you get it all implemented properly. Get in touch and we’ll take it from here.
